|
Cutting Boards Wooden cutting boards are always a welcome gift, they don't dull knives, they look and feel good, and are easy to make, however certain precautions should be taken in making and using them. Select a tight grained wood such as basswood, beech, birch, or maple, avoid using open grained wood such as oak. Use several narrow boards glued together to prevent warpage.
Use a waterproof glue such as Titebond II which is approved by the FDA for use on cutting boards.
Raise the grain by wiping with a damp rag, let dry for 24 hours then sand smooth. Apply mineral oil or salad bowl oil, coat liberally, let sit for several hours then wipe off excess. Avoid vegetable based oils as they will go rancid. If the board is a gift include a small bottle of oil so it can be maintained. The old adage for treating a new board is: oil it once a day for a week, once a week for a month and once a month for life.
1. Wash the board: Use hot water and detergent, a scrub brush may be necessary to remove food particles. 2. Sanitize the board: Use 1 tablespoon chlorine bleach to 1 gallon of water or 1 to 5 solution of vinegar and water, flood the surface and let it stand several minutes, then rinse with clean water and let air dry or pat dry with paper towels. Hint: Keep a spray bottle of sanitizing solution near sink.
Other Precautions
Discard excessively worn or cracked cutting boards, or if they have sentimental value hang them as decorations or use under plants to protect a table top. Use separate cutting boards, one for raw foods such a meat and poultry, and another for salads and bread. Don't soak in water for prolonged periods or put in dishwasher. Making a Butcher Block To make a butcher block it is easier to glue the blocks together in sections rather than attempting to glue them all together at once.
Make a base several inches larger than the finished size of the board, fasten a strip to the top edge, lay a folded strip of waxed paper on the base and against the edge of the strip. Apply glue to ends of the blocks for the first row making it a few inches longer than the finished size, add another wooden strip and apply clamps across the two strips at each end. Lay a bar clamp along the length of the row of blocks and clamp them length wise. Only use enough clamp pressure to squeeze the glue out, don't over tighten. When the glue has dried remove the row of blocks and repeat making as many rows as are needed. Trim both sides of the strips with your table saw, set the fence so you are only trimming as much as necessary.
Using the base glue two of the rows together, offset the joints, then glue another set of two together, when all the single rows are glued together, then glue the double rows together two at a time. Trim the ends and sand the top and bottom and finish the edges. Adding a juice groove is a nice touch, especially for boards that will be used to cut meats. Cut the juice groove before rounding the edges of the cutting board.
Clamp four strips of wood about 1/2" higher than the cutting board around the outside of the cutting board leaving about 1" space at one end as shown above.
With double sided tape fasten four 3/4" X 3/4" strips to the top of the cutting board and a 3/4" thick board in the center so that there is less than 2" between edges of the side strips and the middle board, these are shown in red. If the cutting board has rounded corners attach triangles in the corners as shown by the green line. Use a bushing the diameter of the bit, set the router depth, a plunge router works best for this, make the cut following the outside strips, the center board is used only to hold the router level to the top of the cutting board. Use of wider or narrower strips will determine how far from the edge the groove is. To
make a groove on an irregular shaped board make a template the same
shape but smaller and fasten it with double sided tape. The outside
boards are not necessary, the router will ride on the template. Take
your time, it is more difficult to follow around a template than inside
a guide like the one used for rectangles.
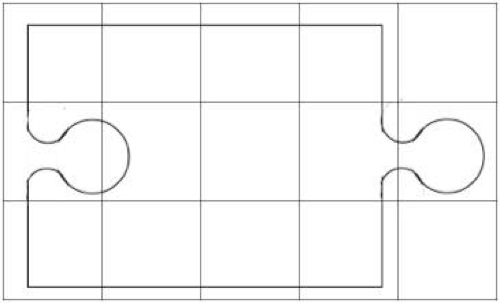
Download the image, enlarge to desired size. Instructions for enlarging grids are here. Use cookie cutters for additional shapes, trace around the outline and draw a grid on the paper, when making a pattern try not to have sharp inside corners, they are hard to clean.
This is also effective with contrasting striped wood
One each of the playing card symbols enlarged 2X makes a nice set for serving cheeses.
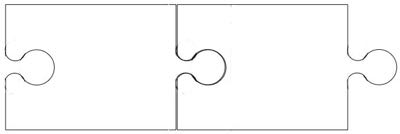
These puzzle pieces interlock for a longer board to cut loaves, or can be used
|